Showing posts with label t-shirts. Show all posts

10.27.2010

Wardrobe Revamp Week 10: Fancied-Up Purple Skirt


It's week 10 of my mission to revamp my wardrobe one outfit at a time, one week at a time. My goal is to grown-up-ify my clothing, plus have some element of every outfit be made by me! And guess what...after 9 weeks at the new job, I still haven't worn the same outfit twice. It's amazing how many outfits I have when I dig deep into those items that I usually pass by in my closet, and add/alter a little something to make them wearable.

This week I tackled something in my closet that was oh-so-plain:

Plain purple skirt that was on sale at Target


+ hair accessory that I bought my freshman year and never wear...


= prettier, fancier skirt! Ian and I were having a lot of trouble getting a good photo of this outfit. So bear with me here. (Ah, it's that time of year when it's too cold to take photos outside!)


I hid the seam of the lacy stuff with some t-shirt flower rosettes and embroidered felt leaves...


...and wore this outfit to work yesterday, with a matching rosette headband that I made myself! Learn how to make one yourself here. Wahoo! Another fancy outfit (that is actually all jersey material and hence super comfortable) to wear to my grown-up job!


10.06.2010

Wardrobe Revamp Week 7: Take Two

Welcome to the real week 7 of my quest to revamp my wardrobe one outfit at a time, one week at a time. Last week I had a wrestling match with my project into the wee hours, so I decided to revamp my bedtime and postpone the project to this week! So here I am - picking up my quest to grown-up-ify my clothing, and have every outfit include something I created myself.

I started with this cute little number. I picked it up from my friend Kerrie at a recent clothing swap.


Unfortunately, it had a couple of stains that didn't come out in the wash. So in order to make it wearable, it needed to be transformed. My favorite part about the dress is the top - how the sleeves and the shirred bust combine. So I cut off the bottom of the dress, just above the stain, and added a whole new bottom with some teal jersey fabric that I picked up last week at Lorraine's.


It was harder than I thought. Hence, the struggle into the night. I think I took it apart and re-sewed it about four times - jersey fabric plus shirred top = wonky.


Even now, I can see about 18 things that aren't quite right about it. But isn't that always how it is? When you're so close in the creating process, you can see everywhere that you went wrong.

But I've decided to make peace with it. Even if I can see imperfections, I'm not sure if the world can tell. Besides, failure is part of learning.


On its own, it's not quite a grown-up outfit - but I dressed it up for work today with a fancy black sweater, earrings, and heels. It's all about owning it.


Have you made something that wasn't quite perfect? Did you move past the imperfections?


9.22.2010

Wardrobe Revamp Week 6: How to Make a T-Shirt Flower Headband

Welcome to week 6 of my mission to revamp my wardrobe one outfit at a time, one week at a time. My goal is to grown-up-ify my clothing, plus have some element of every outfit be made by me!

This week's wardrobe revamp was sort of a revamp in reverse. Lately, I'm been having something I call "bulging drawer" syndrome. My drawers are overflowing, and I don't wear half of the things inside them. It was time to look through and bid goodbye to some things.


Like this t-shirt. It's been a great four years we've had together...but it is time, for sure. Goodbye, pink T! I will revamp you into something wearable! I was inspired by how last week's bib necklace used t-shirt flowers, so I've decided to make a cute little headband with some t-shirt flowers created from my retired T, and I wanted to share a tutorial so you can make one too!


How To: Make a Recycled T-Shirt Rosette Headband
in 5 Super Easy Steps


You will need:

1 t-shirt

a scrap of felt

headband

hot glue gun

scissors


1. Cut three strips from your t-shirt, about 1" x 16".


2. Twist one strip between your fingers. I put one end under something heavy and did the twisting with both hands.


[ this is the part where my cat, Callie, tried to help out ]


3. Roll the twisted strip, starting at one end, around and around until it starts looking like a flower.


Glue here and there as you're rolling so that it will all stay together.


Leave about 1" free at the end...


...and wrap this underneath your flower and glue in place.


Repeat steps 2 & 3 with two other t-shirt strips.
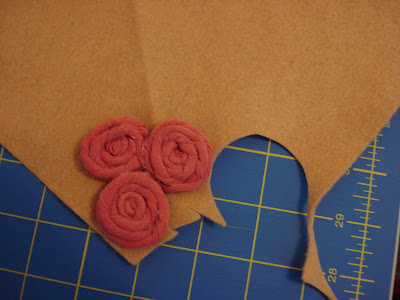


4. Lay the three flowers on your scrap of felt and glue down.


Trim the felt around the flowers so it can't be seen anymore.


5. Sandwich your headband in between the two felt pieces, with the flowers facing out and placed where you'd like them to sit. Apply glue to the felt piece with the flowers attached, and secure to the remaining felt scrap.


Trim that second felt scrap so it doesn't stick out.


And you're done! Now you just have to wear it proudly!


My photographer was out at parent/teacher night, so I had to go it alone on this one!

Enjoy, and let me know if you make one! I want to see pictures!


9.15.2010

Wardrobe Revamp Week 5: Bib Necklace

It's week five of my mission to revamp my wardrobe one outfit at a time, one week at a time. My goal is to grown-up-ify my clothing, plus have some element of every outfit be made by me!

This week I started with this outfit: cute, but plain (as are most of the things I wear!). Needed to be jazzed up. Last week, my creative friend Moira and I got together to talk about crafty biz, and she was wearing a bib necklace that she made out of magazine pages. Since then, I've been seeing bib necklaces everywhere, and I found this tutorial for inspiration.


So, tah dah! My very own bib necklace made from t-shirt scraps, scraps of felt, and fancy buttons from grandma's button box. (Remind me, if I ever record a CD, that this could be the cover art).


I have to say, I'm really enjoying feeling fancy at work. Yesterday I even caught myself thinking about the merits of...wearing heels. Wow. And since I started work, I haven't worn the same outfit twice. I'm going to see how long I can run with that. It's much easier now that I've given myself this challenge - instead of opening my closet and thinking: "Errr, I don't want to wear that," I think: "Hm, how can I make that work?"


9.02.2010

Wardrobe Revamp: Week 3 and another GIVE AWAY!

Welcome to week three of my mission to revamp my wardrobe one outfit at a time, one week at a time. My goal is to grown-up-ify my clothing, plus have some element of every outfit be made by me!

{ Before }

So far, I've revamped two pretty plain but comfy dresses, and this week I have yet another jersey dress that needs a little something to make it more distinct. Thanks to your suggestions last week, I've added not just one but THREE possible ways to spruce up this number. As Nancy suggested, if I did more than one thing I could change it up over and over. I'll never be bored! Check it out:


{ Revamp #1 }

For this revamp, Liz suggested:

I have a purple scarf that's square that I'd love to turn into two mobius scarfs...maybe that could complement this outfit?

She donated this completely beautiful purple and cream scarf, which I transformed into two mobius scarves (one for me, one for her) that wraps around three times. It adds some great detail, and also helps me feel a little less naked in the neck area! Liz, thanks so much! I have to see you soon to give you your half!


{ Revamp #2 }
(Side Note: since I have to model these babies, my sweetie, Ian, has been charged with the task of taking the photos. He likes to really ham it up: "Give me...whimsical! Give me...angry!" So I just end up laughing my head off and ending up with these silly shots!)


Anywho, both Cathy and Joanna suggested that I create a necklace, and since I *happened* to have just enough scraps from Liz's scarf left, I created this knotted fabric necklace. It's a big tube of fabric with beads inside, and knots in between each bead. I love it! If you'd like to make your own, there's a tutorial here. It's a great sewing project to start with.

{ Revamp #3 }
And lastly, from Joanna's suggestion:
Joanna Read Cotter of Joy in my studio said...

I love what you did with the first outfit, what a transformation and it looks gorgeous on you! This other jersey dress is such a pretty warm gray - I could see it with one of your recycled jersey necklaces in lavender, orchid and plum tone.

I took Joanna's advice plus a little inspiration from the tutorial above to create this necklace out of an old purple t-shirt and some foofie white fabric scraps.

{ close up! }

And because you were so generous with your suggestions, I made an EXTRA purple t-shirt necklace to GIVE AWAY this week! Just leave a comment below before next Tuesday at 12pm, and you'll be entered to win! I'll pick a winner at random and let you all know in time for next week's wardrobe revamp post!


10.11.2009

First Commission!

This week I got to work on a super fun project on commission for the museum. I remade a batch of child aprons for the 60's Dominican market exhibit called Fefa's Market.

First I got to pick out some vintage 60's fabric from my favorite fabric shop in my hometown.

Then I created a pattern and cut them all out.

Lots of ironing to make the bias tape that goes all around!

And sewing it all together!

Voila! I can't wait to deliver them tomorrow!

Also, Geneva came over to keep me company while I was working on them. She was on a quest to make an awesome outfit to wear in her marching band for the PRONK! event happening in Providence tomorrow. She wanted to use t-shirts to make something to wear over her bright red spandex pants...
One trip to Michael's, two t-shirts, some cutting, tying, and sewing later, here she is! The best part of the night was when she spontaneously yelled out: "I love sewing!" She did an awesome job!
Related Posts with Thumbnails